Sunday, 6 May 2018

Testing testing

If you're a seamstress/sewist sat with your fingers in your ears and a rather fetching eye mask on you may not have noticed a trend for dungarees; whether it's Tilly and the Buttons' Cleo, Closet Case Files' Jenny or By Gum by Golly's self drafted pair.

Personally they're not something I had ever considered for myself thinking they'd look a bit childish on me. It's funny really considering dungarees were originally work wear but they're something I always associate with children who frankly look adorable in a pair.

Jen at Jennifer Lauren Handmade's take on it is the Pippi pattern which I was lucky to be a tester for. I quite like that she doesn't tell you a large amount about the pattern before you sign up to test them so you get what you're given and see what you can create. It stops my preconceptions and lets me see what I can do.


It ended up that I really liked the pattern. So judgey Humbug should just shut her mouth. I went for the size 20 C cup. I cannot tell you how much I appreciate a pattern with different cup sizes. I hate doing a FBA so have it all right there is fabulous. I love the lines of the streamlined skirt and the pleats with the large pockets. I went for purple needle cord as I happened to have some knocking about. I cursed this decision when turning the straps believe me! You know what makes turning a tube tricky? Friction. You know what needlecord has loads of? Friction!


As it's me there can't be something I didn't make a hash of. With this project it's that I made the hole to put the jeans buttons through much too big so they now pop straight through the fabric. I'm going to reinforce the holes with some off cuts and stitch some buttons on. No one will know....other than the people I insist on pointing the flaws out to. Which is everyone.


Jen had some issues with the fitting of the bib as you can see in the picture below which causes it to gap at the sides. She did actually amend this problem but because I'd already got the pattern pieces cut out I opted to go with the original. It does make my eye twitch to look at it so I'm going to unpick this bodice and re-cut the amended one. Should have just done that in the first place really. Quiet Captain Shoulda, you don't know my learning methods!
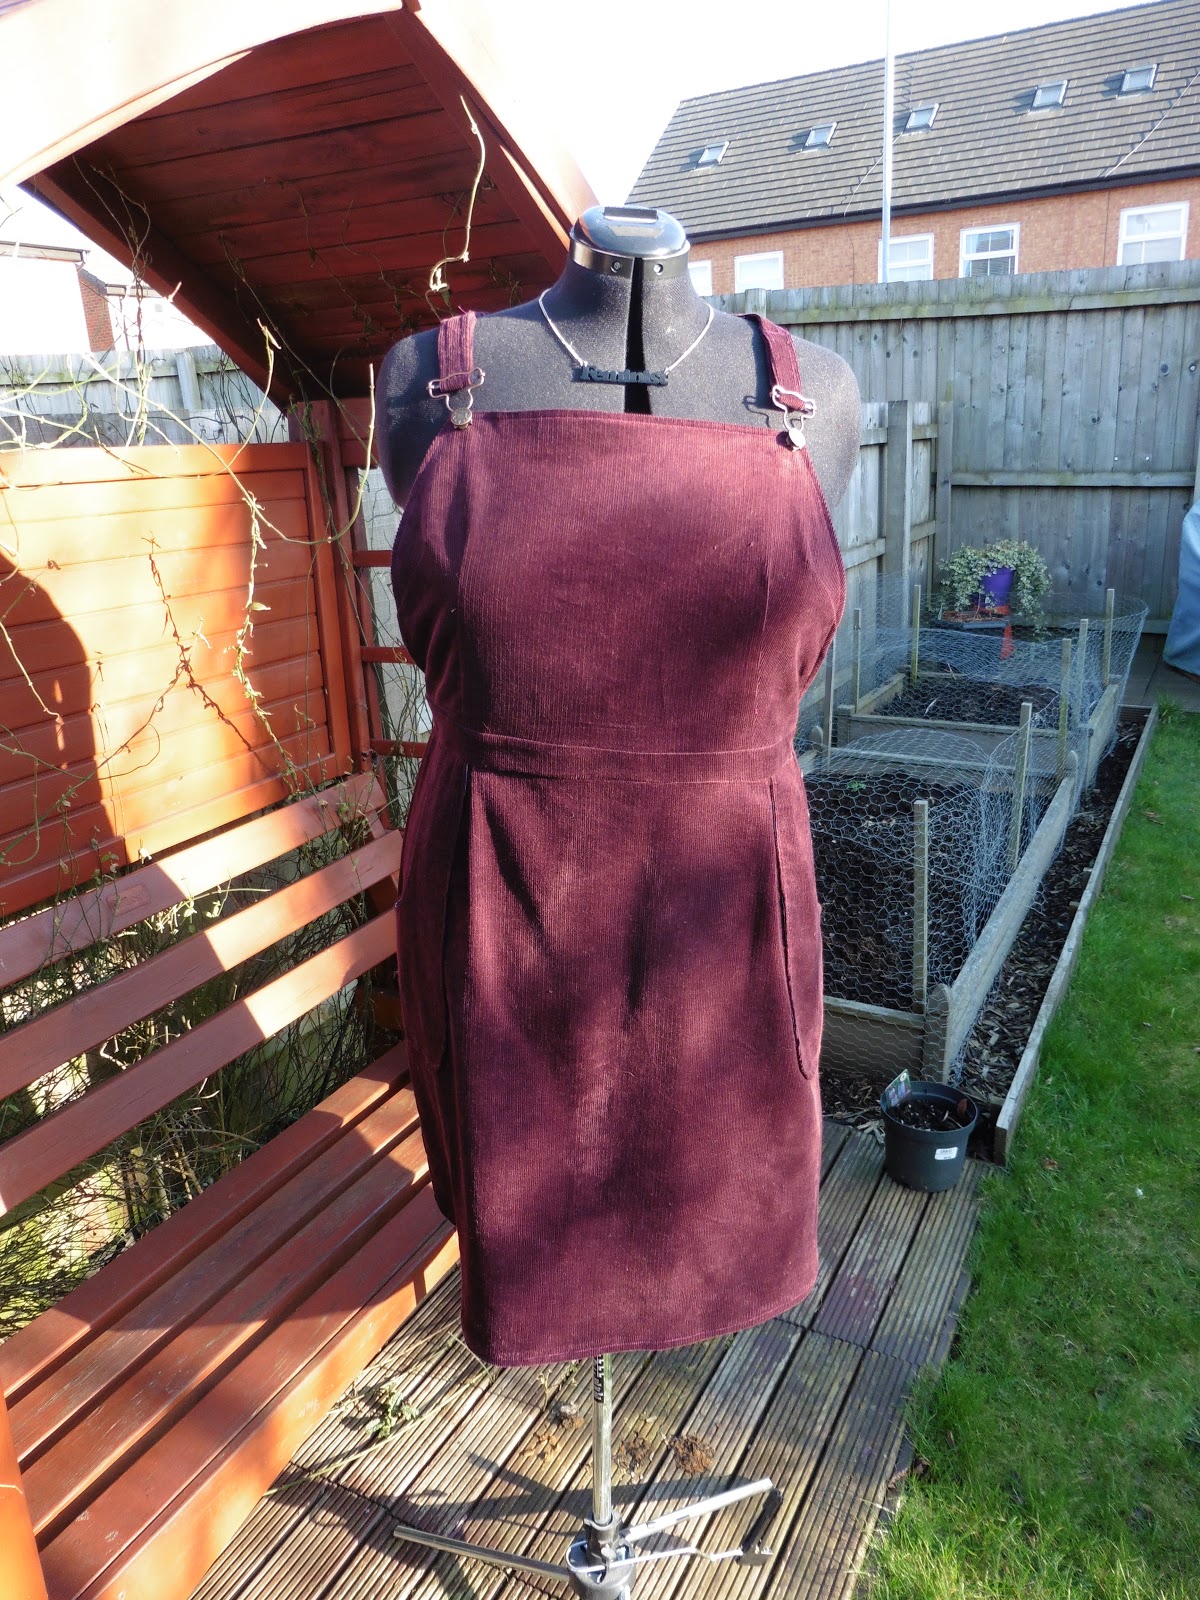


So I would recommend if you get the chance to pattern test for Jen (she just closed sign ups for new testers but keep an eye out in future) I would recommend giving it a go. If like me you tend to stick to comfort zones it pushes you to try something new plus she's a safe pair of hands as I haven't seen a duff pattern from her.


Now I'm off to enjoy the unprecedented warm weather for an English bank holiday. Take care xXx

Saturday, 28 April 2018

Rawr!

I like to think I've been around the block a few times with this crafting lark. I'm not as green as I'm grass looking, nosiree.

I know the rules. If you've got an event coming up make sure you give yourself plenty of time to make either your knockout dress or the lovingly handmade gift. It just makes sense.

So how did I end up midway through December taking painkillers like tic tacs because my hands had formed twisted stumps from knitting based overuse? Cause knowing the rules is not the same as following them.

Plus I'm invincible.

Each spike is knit, stuffed with toy filling and stitched on to the jumper with that cute little tail. 

Though just look at how cute he is! If that's not worth an RSI I really don't know what is. The pattern is the Stegosaur hoodie by Jane Burns. I'd actually seen this back in November 2016 (you'd think this would be enough warning for a Christmas present in 2017, turns out no) and thought how adorable it would be on my little nephew.

This little dinosaur wants to run free!


For my very beginner knitter skills it's a really easy make despite a small melt down when I realised I couldn't remember the magic loop method and tried double point needles. Double point needles are hard core! I still have no idea how those darn things work. I'm magicloop4lyfe... you know once I remember the whole loop bit.

How cute is the moss stitch hem, cuffs and button bands

I found from the pattern that you do not need as many spikes as it tells you to use; plus deadlines meant I also didn't have time to make as many as instructed. I also needed a couple more balls of the main colour for the body. I used the instructed Cascade Yarns 220 Superwash in Silver Grey, Red Wine Heather, Lichen and Straw.

I'd always thought I hated wool but this stuff was a pleasure to work with. It didn't set my teeth on edge at all but please little man don't chew the sleeves. That may just push me over the edge.

Much better than this twisted monstrosity. Like I got a toddler with a fever dream to draw a jumper 

Sunday, 2 July 2017

The Tracy Dress

I'm gonna tell you about my friend Tracy. There are people you meet who are positive and encouraging. There are people who when you just want to give up and hibernate are the kind voice urging you to try again tomorrow. There are people who inspire your darkly cynical disturbed little heart. Tracy is one of these people. 


So Tracy knowing my love of African Wax print kindly brought me some lengths back when she went home to Zimbabwe for a family wedding. Ideally she would have taken me with her but no one is perfect. When she gave me the fabric she apologised for the lack of colour, at the time I was dressed in top to toe black, grey and navy. Colour isn't really my 'thing'.

Hand blind stitched armholes. Only the best for Tracy.

This was the longer of the two lengths and I decided immediately it needed to be an Anna dress. Having made a couple of Anna dresses now I realise that there's too much ease in the pattern across my shoulders causing the neckline to bag out. I corrected it with this version and I'm really happy with the fit. It's also taught me a helpful fix as it's a problem I've noticed with a few patterns which have a higher neckline.


It was very important to me I made something that would do Tracy proud. Having jumped on many a suitcase on a return flight I know weight allowance is tight so I appreciated her taking the time to find and bring me back fabric. Going out to tea with her once it was complete she told me it made her look at the pattern with renewed interest so I think mission accomplished.


My example of wabi sabi. Nothing is perfect and I am no exception. I overlocked my seam to the body of the dress. Doh! Fairly happy the repair (rapid zig zag stitch over the hole) is not too obvious.


Saturday, 10 June 2017

Un-bear-ably cute


I'm not a big kiddie person; a big kid yes but a kiddie person, no. There are a few exceptions to this as there are in all things. One of these exceptions is my previously mentioned nephew. This project comes as a result of his rather fine Mother requested I make a memory teddy out of his old baby grows. You're darn tooting I will! 


She gave me these four baby grows. Obviously as there's two white this needed to be the body and then the greyish one contrasting bits like the pads of hands and feet. The zebra one however as soon as I saw it I knew teddy needed to be able to dress up. I did initially play with the idea of forming an actual zebra head but once I stopped drinking the battery acid I realised this was madness. A brief googling of zebra hoodies later and popping a mane in the hood was the new plan. 


The pattern is from a lady called Joy is available for free with a tutorial here. I hadn't expected how big it would be when all printed out and I realised rapidly that I did not have another fabric for it. If I had read all the way down Joy's tutorial I would have realised the pattern made a teddy 18" high! I never read to the bottom and have yet to recognise why this is a bad idea. Anyway a quite trip to the photocopier later to reduce the scale down to 65% and we have a much more manageable pattern. 


Baby grows take some taking apart I tell you! Funny considering how built to last they are when they'll only be worn a couple of weeks, tops. Oh but how soft though?!? I was vaguely concerned my nephew would never get to see teddy as my mother took quite a shine to cuddles with him.


His eyes are safety eyes which were the devil's own job to attach. I had to use heavy duty pliers to attach them and as a result slightly scratched them. Sorry teddy I'll get you on the waiting list for cataract surgery. The mouth and nose I embroidered on with well embroidery thread actually.  


The hoodie is very haphazard as it's self drafted. You know this because it didn't occur to me to draw shoulders in my mock up attempt. I didn't have quite enough fabric to do all of the hoodie in the zebra print so used the contrast fabric to make the back. I also re-purposed the cuffs of the baby grow to make the sleeves cuffs. The mane was wool looped over a piece of sellotape and basted on to the seam allowance of the hood. I imagine there is more straight forward way of going about this but it didn't occur to me. The hood I couldn't really work out how to make it actually enclose the head so I just whacked a bunch of darts in it and called it good. 

Hanging out with the other wild animals
All in all I'm fairly happy with how he turned out and from the photos I've seen of him with the main man he's happy with the finished result too.

Sunday, 14 May 2017

Me made man

Ok so today I'm not going to post a round up of the week. My instagram photos are all taken in my bedroom mirror which is too dark and not the world's best photos. Until I up this game I'm gonna leave the daily photo. Still wearing daily me made though.

So instead I bring you the fella. He had his birthday last week so I decided to make him some shirts for his birthday. We go on honeymoon later in the year so he asked for some nice cool shirts to take away with him. I have now perfected the Colette Negroni pattern so I made him a few in delicious liberty print tana lawn which fortunately comes reduced from Abakhans.

I also made him model; though frankly the fella is a diva. Not content just to star but also he provided art direction along the lines of: 'I should really be wearing my hat for this look' or 'no I can't pretend to be potting plants, this is a fancy shirt and it won't look right'. What can I say, you can't argue with the talent.

One thing I fail to get my head around is that men's shirts button on the opposite side to women's. Yes this is because women's are designed for someone else to do up for you and therefore not as easy to do up yourself. Yes it means he struggles to do his shirts himself. No it probably isn't necessary to make a statement on feminine oppression in your husband's birthday present...

He picked the fabric prints himself. This one I don't think he expected the pears to be as large when he picked it but I think he's pretty happy with the finished result.


Took the photos a bit late in the day so they're a little shadow heavy.


Especially this shadow. That one follows him around everywhere.


As standard I only decided I was going to do this the week before his birthday. Sadly I was two days late delivering but I figure it was worth the wait.


This one is really similar to the shirt that I made him last year. He's a man who knows what he likes. It didn't occur to me to use my edge stitching foot until after I'd put the first set of pockets on so one has a double line of stitching. I am calling this a design feature.


My handsome man who is in no way awkward being made to pose for photos. Not awkward at all.... no siree bob.


I batch stitched all three shirts which is a much quicker way to work. Pity he didn't pick three patterns that I could use the same thread for. I just switched over to the green at each point that felt like a sensible stopping point.


I love this relaxed style of collar and he always looks like he's on his hols when he's wearing one.


 This one is my favourite fabric choice and button combination. The buttons all came from a mahooosive bag of buttons I got at an Abakhan sale. The fabric has a slight fade to the print so it's really hard to work out which is the right side. I fully expect I've right and wrong side facing throughout this shirt.


Sat amongst his pride and joy. At some point I'll talk about the garden because he does work so hard on it and it is a beautiful space.


I think this is my favourite photo. Man of mystery. What is he thinking? 'World peace;? 'The fortune 500'? 'Will this silly woman stop taking photos so I can get back to my plants'? Possibly.


 Co-starring
Queen of Sheba
Bombay too hot for TV

Sunday, 7 May 2017

Musings on Me Made May week 1

Hi all.

So that's the first week of May done. I've worn me made every single day and only been late to post once. Two things that jump out at me looking at my round up is A. Fit and B. Crappy photography. I will work on the photography, probably not this year but it's something to think about for next.


I love the coco pattern. I like the random assortment of buttons I stitched on. Sometimes I wonder if it's a little bit children's TV presenter but then I realise I don't care. It was an early days make and it's still going strong. Fits nicely and even though it was made pre-overlocker has not needed any repairs.


This was not a good look let's face it. I've got the tie in a weird place and the top is less fitted so really only goes with more fitted bottoms. My drawstring trousers with it just makes me look utterly shapeless. They're both very simple patterns so look at me grinning like it's my first make. It isn't so no excuse.


The bruyere shirt is also a favourite. Deer and doe really don't go up to my size so I had to hack the living daylights out of this pattern. Also due to my ongoing issues of obliviousness about the size of my waist I sized it up too much. It's comfy and good for work though. 


I don't know why but a sleeved t-shirt under this make me think I look like Billy Joel in uptown girl. I don't know why I have this in my head as I just looked up the video and he is very obviously wearing a long sleeve shirt. Anyway the t-shirt is on because my next Rosa will definitely need a full bust adjustment. As a fix for this one I'll try adding a couple of buttons on the inside.


This is defintely an example of awful photography. You only know what I've got on cause I tell you. I'm fairly sure photographs shouldn't work that way. *sigh*


I'm not sure the bettine is a shape that really works on me. I'm beginning to think more structured items are much better. It's comfy and has big pockets though so I kind of think of it as my house coat. 


Now this is just lazy photography. Couldn't even be bothered to stand up so just took a photo of my lap. You deserve better. You really do. 


Wednesday, 3 May 2017

A Rosa by any other name...

Evening all. 

May I present to you my wearable muslin for the Rosa shirt dress. I can be a bit hit and miss with Tilly and the Buttons patterns. Patterns such as the Coco and the Rosa grab me right away. The Martha was a slow burn, I wasn't keen on the sample but I've seen other versions which have really appealed. That just goes to show the versatility of a sewing pattern. 


Then there's Marigold pattern which reminds me of the Spaced episode Dissolution:

Tim: I know. I look like a (naughty swear for lady parts) in a jumpsuit.
Daisy: Don't say that, Tim. That's a word that hates women.
Tim: What? (naughty swear for lady parts)?
Daisy: No, "jumpsuit" 

Just a joke as obviously there's nothing wrong with the pattern it's just not my taste as I categorise it in the 'trendy'. Yep I used the word trendy. I went there. 


The Rosa however is exactly to my taste and I was really excited when it was realised. Especially when I saw the purple cord shirt dress version Tilly made herself. I wanted one just like it but first off needed to make a muslin because as a busty lass the button down can be a tricksy beast. It's sleeveless because maybe the muslin idea came to be me at the last minute and then just maybe I only had enough fabric to make it sleeveless. The colour scheme came from googling paint matches cause frankly I'm winging this most of the time.


I love the piping in the princess seams and yoke. I did debate whether adding it to the pockets was too much but then though sod it why not. I did draw the line at the collar. As we all know you pipe collars or pocket, never both...


The armholes are bound with bias binding. It's a technique I've had difficulties with in the past but I'm quite pleased with how smooth this one looks. Initially there was a bit of wrinkling but that calmed down with enough steam.


My only stumbling point was the back yoke. I cut a little too far in when turning at the point so had to stitch again further across to prevent an exposed edge which makes it unbalanced. Though as with all questions of errors in my work I ask myself would anyone who I didn't tell about the problem notice it?....then I tell people about it.